Wednesday 30 September 2015

Loving the Scarf

Scarves, it seems, have made a big come-back in recent years. After watching a You Tube video on the different ways to wear one, I was firmly convinced that we could throw out the sewing machine and just wrap ourselves in a length of fabric!


I made this scarf with its little scrunchie holder from a fifty cent remnant.

The scarf and the scrunchie are almost identical in construction so instructions for one will be relevant for the other.

For the scarf you'll need a piece of fabric, with a soft drape, around 50 inches (127 cm) long by around 14 inches (36 cm) wide.

The scrunchie requires a 20 inch (51 cm) length by 2 ¾ inch (7 cm) width.


To make both scarf and scrunchie, fold the fabric in half lengthwise and stitch, leaving a 2 inch (5 cm) gap at both ends. I like to make a second row of stitching so fraying won't be an issue.


Pull through to right side.


Now, with right sides together, pin the ends and stitch, forming a loop.


To make closing the gap neat it's a good policy to press those seam allowances in place using the tip of the iron.

For the scarf I hand-stitched the gap closed.


But as the seam won't show on the scrunchie, I've stitched it closed on the machine leaving a small hole to insert the elastic (but not yet).


Press the seam of the scarf flat without pressing the edges, as you want it to be soft and flowing. 


That's it for the scarf, now to finish the scrunchie.


The scrunchie can be pressed flat to make the next step easier.


Stitch along both sides forming a channel in the centre for the elastic.


You'll need about 4 inches (10cm) of elastic for this scarf scrunchie. Thread the elastic through the channel using a safety pin. Firmly stitch both ends of the elastic together and pull back into the channel. Hand-stitch the gap closed.


Scrunchie complete!


I've trimmed mine with this cute brooch made by a crafty young miss for her stall at a school fete.

Saturday 26 September 2015

Checked and Buttoned

Spring in the antipodes! The weather is warming up and the check cotton mentioned here is now stitched and ready to wear.


With only 1.35 metres of fabric it had to be a short-sleeved model which I like a lot now that it's finished.


Off-the-peg clothing sizes have altered so much in recent years that I must keep reminding myself my pattern size is 12, not 10 or 8 as I would buy ready made. Hence this Style Pattern No 1064 (View 3), which is a size 10, was never going to fit in its original form. Only when it was cut out with darts and seams stitched did I finally get the message that it was really not going to fit. Sigh.


I liked the way this pattern shaped in at the waist but the back darts had to go. Next the side seam allowance went, with a gain of another 1 1/2 inches. Almost there.


The final gain was made by cribbing some of the front facing, which was a folded piece, and turning it into a button band.

With these adjustments, the size 10 converted to a size 12.


The darts in the front give a nice shape at the waist even if the back darts had to be sacrificed.


A shortage of fabric meant no chance of matching the checks on the side seams.


I like the collar …


And the little bit of puff at the sleeve cap.


And I like the cuff on the sleeve and the pink buttons from the button box … In other words, I LOVE this shirt. Considering the fabric cost all of $1, I think I'll get more than my monies worth from this make.

Sunday 13 September 2015

Fabric Find of the Week

This week's charity shop crawl netted a summery, lightweight cotton fabric for $1.


I'm a sucker for a check shirt, or a striped one for that matter. I'm tossing up what to do with the collar. Perhaps a regular shirt collar with a pink gingham collar stand?


Or maybe the collar of View 3 in this Style No 1064 pattern. There is only 1.35 metres of fabric to play with, so enough for a short sleeve—with a cuff?

Sunday 6 September 2015

The Pyjama Game — Part Two

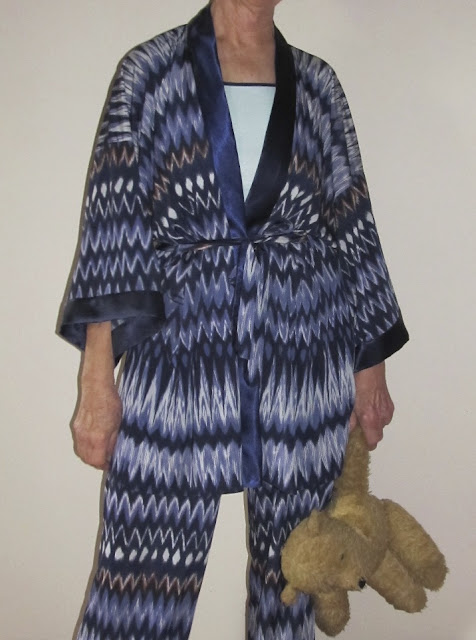
In my last post I was considering making a kimono and singlet top to go with the 'jama pants.


Done, and done.


I had a pattern for a kimono (Pattern Pack No 12) that I picked up at a charity shop a year or two ago. It had been an inclusion in a copy of a magazine called Successful Sewing and had no instructions enclosed. The 'fully illustrated step-by-step instructions' could be found in the magazine which, of course, was missing. But how hard could it be to make a garment with three main pattern pieces? Not hard at all as it turns out.


There was just enough fabric left after making the pants to cut out a short kimono which was what I wanted. 


I found a very small piece of navy Thai silk in the sewing box, just enough to do the cuff and collar band. The waist tie used up the last of the main fabric (a really silky polyester) and the last of the Thai silk as a ¼ inch piping.


This Style pattern No 3889, 1983, was the base I used for the singlet top. View 4, size 12 just needed to be taken in at the side seams and the neck shaped to accommodate shoulder straps. 


The fabric is a cotton interlock and the neck and armholes are finished with a top-stitched standard bias binding. If I remember correctly, the fabric has been in the sewing box since the 1980s. I knew I'd get around to using it one day!


Wednesday 2 September 2015

The Pyjama Game — Part One

I'm not a big fan of girly pyjamas and frilly nightgowns but it's good to have something comfortable to lounge around in after the day's work is done.


This bold polyester print found lurking in my sewing box could never be accused of being 'girly'.


Simplicity No 4585, View D proved a good pattern to adapt for these pants. They're designed to be three-quarter length for a tall person but are full length for me with the addition of a band at the ankle. I've used elastic at the waist rather than the drawstring used in the pattern.


They were quick and easy to run up on the overlocker. The fabric is very slippery so I found it helpful to pin along the length of the seam a little distance in from the edge so the pins hold it in place while sewing. 


I plan to make a singlet top in a plain colour to go with the pants and, as there's quite a bit of the polyester left, what about a kimono? Now that's what I call lounging in style.